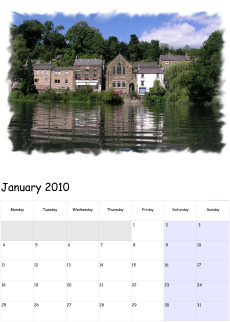
Make a 2016 personalised calendar from your own photographs.
Looking for a personalized gift this Christmas that will be enjoyed all year? This will be the best present you could give someone as it lasts until next Christmas.
This page features an easy to follow video tutorial on how to make a printed calendar using photographs YOU have taken.
The monthly calendar templates are provided free so you can make a unique gift for someone right now. All you need is
Paint Shop Pro (or any photo editing software that supports layers such as Gimp, Photoshop etc), A colour printer, some matt finish paper and 12 images.
The Calendar Step by step video Tutorial.
Click the play button to watch and learn how to create your calendar.
This calendar video tutorial is best watched in Full Screen mode by clicking the icon
in the bottom right of the player.
Template Download Area: Think about which YEAR template you need before you start your Calendar project. Don't get the wrong one !
Looking for a personalized gift this Christmas that will be enjoyed all year?
I will show you how easy it is to create your own personalised photo calendar.
Include images of friends, family, or special places on your calendar to remind you of special people or events.
Photo calendars are a very thoughtful unique gift and they last all year.
Please watch the tutorial video first so you can see how quick and easy it really is to make a calendar. Once you have watched it, read the notes here to help you get the best out of your calendar project.
So what do you need to be able to make your own calendars?
1) The Calendar templates (these are provided free).
2) Corel/Jasc Paint Shop Pro (or any graphics package that supports layers including the Open Source software Gimp).
3) 12 images of your choice.
4) A Colour printer and matt or gloss photographic paper
The "Basic steps" for creating each month are as follows
1) Open the month template
2) Open an image you want to use
3) Copy the image to clipboard
4) Go back to month template and "paste as new layer"
5) Set Layer blend mode to Screen so it creates a fancy looking edge
6) Move your image to top left of image area
7) Resize image at bottom/right so it fills out the image area
8) Flatten image layers
8.5) Optionally add a description under your image, highlight special dates etc.
9) Print it out. Repeat these steps for all months.
Once you have printed out all 12 months, you can create the front cover image for your calendar using the same technique as you did for the Calendar months.
What images can I use with the calendar templates?
I have designed the Calendar templates to be very easy to work with and they are optimized for the most common size of image produced by a digital camera at the time of writing (October 2011),
This is a 10 Mega pixel camera which produces an image of 3888 pixels wide by 2592 pixels tall.
You can use ANY image at all with these templates as long at it has a width of at least 1024 pixels across and ideally should have an aspect ratio of 3:2 but this is not that important. These are not really suitable for portrait images, please use landscape images.
The monthly templates are high resolution 3958 pixels wide x 5545 pixels high so can accept a wide range of photographs, the imported image will be resized to fit inside the frame area on the template so you don’t need to worry too much.
They are good enough to print at A3 size if you really want to, if you intend to print A3 then try and use good resolution images so they look nice and sharp.
The images you want to use can be from many sources not just digital cameras.
In the video tutorial you will see I have used all sorts of images from iPhone 3GS, Canon Ixux 430, Olympus 5050 and a Nikon D70 Digital SLR camera.
How about using old photographs from your family album or your mum and dads wedding photographs, University graduation day photos, 50th Birthday party photos.
You are limited only by your imagination, there are so many ideas you can use to personalize your calendar.
Preparation of your images.
Before you start creating your calendar it is worth spending some time selecting which photographs you intend to use for which months. For instance if you are using photographs of your home town then you may want to use ones that are appropriate to the seasons such as a snowy scene for January or one of a Christmas tree in your market square etc.
If you a going to use family photographs for the calendar then how about using matching them up with the months that relate to their birthdays or wedding days etc.
What software do I need?
Most calendar tutorials seem to use Adobe Photoshop, Photoshop is great but can be very complex to use and an expensive bit of software, When I designed this tutorial I thought it would be good to use a more common graphics package so I have produced this based on using the popular package Paint Shop Pro.
This popular software has been around for years, originally made by Jasc now Corel. The latest version is Corel PaintShop Photo Pro X3
I have used my calendar templates will all versions of Paint Shop Pro from V7 all the way up to Photo X2 Ultimate and it works in them all. So hopefully everyone should be able to follow my tutorial.
You should be able to use any graphics package as long as it supports layers which most do including the completely free graphics software Gimp v2.7
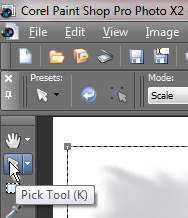
The video tutorial you have watched uses Jasc Paint Shop Pro X (version 10).
If you are using Version 7 of Paint Shop Pro then the "pick tool" will be called the "Deformation tool" but it performs the very same function.
What paper to use for printing
Normally when you want to print a photograph out you would use a glossy photo quality paper but in this particular case it would be good if the dates on the calendar can be written on with a pen so people can add in appointments and information.
Remember a calendar should be a practical useful item not just a photograph.
If you were to use glossy photo paper then this would mean you would have to use a fine marker pen (such as a CD Marker pen) which is not ideal. Also glossy photo paper tends to be expensive on a per sheet basis.
So the way to solve all the problems here is to use Matt photographic paper. Matt paper tends to be quite cheap and allows you to write on it with a pen or pencil yet still produces a high quality print so your photograph at the top of each month will look good.
You can use a branded matt paper designed by your printer manufacturer or use a not so well known brand which will be considerably cheaper. I have tried several of these cheap alternatives and they all seem to perform well.
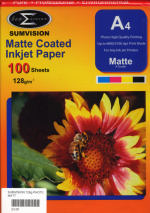
For instance you can get a pack of 100 sheets of matt finish paper for just £3
The paper I use is Sumivision Matte Coated Inkjet Paper, this is 128g/m2 and costs just £3 for 100 sheets from a local computer shop called PCB-Plus at City Rd Business Centre, City Rd, Derby.
The print quality that you get with this paper is outstanding and because its so cheap its not going to cost a lot to run off several calendars.
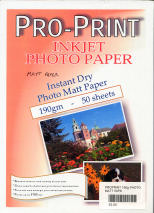
The is another paper I have used which is slightly thicker so makes the calendar look a bit better, it is Pro-Print Inkjet Photo Paper, this is 190g/m2 and costs just £2 for 50 sheets from a local computer shop called PCB-Plus at City Rd Business Centre, City Rd, Derby.
The print quality that you get with this thicker paper is also outstanding.
Double check each sheet of matt paper before you put it into your printer to ensure you have the printable side to correct way up, matt paper generally has a pure white coated side and a normal plain side so its important that you print on the correct side of it otherwise the print will look bad.
It is important to select the correct paper type in your printer setup dialogue box before you print anything. If you forget to do this then your printer will default to plain paper.
You should now have 13 sheets that are ready to be bound together to form your personalized calendar.
Binding your calendar – The final stage in producing your calendar.
It is now time to bind your 13 A4 sheets together, now there are several options available to you here depending on your budget, how professional you want it to look or how quick you want to finish the calendar off. Its your choice, if YOU have some alternative ideas for this then please let us know and I will add them to this tutorial.
1) Calendar binding service at Staples
If you are in the UK then there is a service available at your local Staples store, simple take your 13 sheets to your nearest Staples centre and goto the Copy&Print Centre and ask them to create a calendar for you from your printouts.
This is a while-you-wait service and does not take very long.
This service costs £4.99 which is quite expensive but they do bind it like a proper bought calendar (i.e. you can move months over the top to the back).
You hand them the 13 sheets and they will…
Add a backing cardboard sheet
Punch a set of holes in the top of all the sheets
Bind the whole lot (14 sheets) with a calendar spiral binding coil.
Give you a hanging hook
2) Bind it yourself
You can buy a Comb Binding Machine
from stationers to bind documents at home. This option is worth considering if you intend to make lots of calendars year after year.
These machines will punch a row of holes and then allow you to feed in a binding comb into the holes. These cost from around £25 upwards
Generally the binding combs that you use with these binding machines do NOT allow you to turn the front month over to the back of the calendar as there is a strip of plastic that joins the rings together so you would have to remove any spent months.
3) String
This is the quick and cheapest option for holding the sheets together. All you need to do is a get a standard hole punch and set the guide on it to the A5 setting. Then place your sheets into it (just a few at a time) and punch the two holes in the shortest edge. Once all 13 sheets are punched you will need to thread a length of string or perhaps a bit of ribbon (to make it a bit posh) through from the back to the front and tie a knot in it.
If you are planning to make a few Calendars and really want them too look good then its worth investing in a dedicated Calendar binder :
Below are three screngrabs from three different versions of Paint Shop Pro. The first one shows Version 7, the tool that you are going to use to move your image into the decorative frame is called the Deformation Tool but in version X and X2 it has been renamed the Pick tool.
If you have used the Deformation tool (PSP v7) instead of the pick tool then you need to click the Apply button before you can flatten the image.
Photoshop
If you don't own Corel Paint Shop Pro but do have Adobe Photoshop then here are details of how to use Photoshop to create the calendar instead.
I have based my instructions on Adobe Photoshop CS2 but as we are doing basic stuff I think pretty much any version of Photoshop should work with this. You need to watch the video tutorial first so you get the idea of what we need to do as the concept is the same with Photoshop but the tools and names are different.
1) Open a blank month template.
2) Open the image you want to use.
3) Goto the Select dropdown menu and click All (or press Control-A) this will put the "marching ants" around the image.
4) Goto the Edit dropdown menu and click Copy (or press Control-C), close the image now.
5) Goto the Edit dropdown menu and click Paste (or press Control-V). The image will appear on top of the template.
6) Goto the Layers palette and change the "blending mode" from Normal to Screen, The image should now be masked by the black frame of the template.
7) Goto the Edit dropdown menu and click Transform then select Scale.
8) Its best to maximise the window now as you may need to access the corner adjustment handles which may be off the image area.
9) Click anywhere in the image and drag it up into the frame so that the top left of the fancy edge frame is filled with your image. (i.e. no black bits showing)
10) Now press and hold the SHIFT key on the keyboard and use the mouse to drag the right/bottom corner handle of the adjustment window up until the image covers all the fancy edge of the frame.
n.b. Keeping the shift key pressed while moving the corner handle will maintain the aspect ratio of the image as you resize it.
If you need to adjust the height slightly to make it fit then do not hold the shift key down.
11) Once you are happy with the position hit the return key (or click on the tick at the top of the screen)
12) Goto the Layer dropdown menu and click Flatten Image.
Printing the Calendar pages in Adobe Photoshop:
1) With your flattened image open goto the File dropdown menu and click Print with Preview.
2) In the Scaled print size area tick the Scale to fit media option.
3) Click on the Print button and then the Properties button so you can select the media type.
4) Click ok and ok and it will then print the full page.
GIMP (free image editing software)
If you don't own any graphics programs and don't want to pay for any then you can use some free open source software called gimp, here are details of how to use gimp to create the calendar instead.
I have based my instructions on GIMP v2.7.3. You need to watch the video tutorial first so you get the idea of what we need to do as the concept is the same with GIMP but the tools and names are different.
1) Open a blank month template.
2) Open the image you want to use. Click on top of the window of this second image window to select it.
3) Goto the Select dropdown menu and click All (or press Control-A) this will put the "marching ants" around the image.
4) Goto the Edit dropdown menu and click Copy (or press Control-C), close the image now, Select "Don't Save" when asked.
5) Goto the Edit dropdown menu and click Paste as -> New Layer. The image will appear on the top left of the template.
6) Goto the Layers palette and change the "blending mode" from Normal to Screen, The image should now be masked by the black frame of the template.
7) Goto the Tools dropdown menu and then Transform Tools then select Scale. (or Shift T on the keyboard).
8) Now press and hold the Control key on the keyboard and use the mouse to drag the right/bottom corner handle of the adjustment window up until the image covers all the fancy edge of the frame.
n.b. Keeping the Control key pressed while moving the corner handle will maintain the aspect ratio of the image as you resize it or just click on the chain links in the dialogue panel that shows.
If you need to adjust the height slightly to make it fit then do not hold the control key down.
9) Once you are happy with the position click the Scale button and after a few seconds it will make the image show through the fancy frame edge.
10) Goto the Layer dropdown menu and click Merge Down.
Printing the Calendar pages in Gimp:
1) With your flattened image open goto the File dropdown menu and select Print and click Print.
2) Click on the Print button and then the Properties button so you can select the media type.
3) Click ok and ok and it will then print the full page.